The uniform that the mounted riflemen wear is pretty close to the standard uniform type of the infantry. So from their design, they don't fit for a conversion into garde du corps or mounted grenadiers. The uniforms would fit with the dragoons, but they were equipped with a sort of special shakos typical for Wurttemberg. It's the same type that is worn by the riflemen from the HaT Wurttemberg infantry set - but unfortunately these figures are smaller than the newer cavalrymen, so headswapping is no option at all.
Let's face it - the only possible conversion are the light horse regiments. There were two of them - I decided for the 2nd regiment. The first regiment would be equally equipped, but their cuffs, collars and outer breast line (or total breast, if painted in a pre-1810 version of the uniform) would be in yellow colours.
Okay. The first thing to be changed are the horses, because the sattlecloth differs a lot from the ones that the mounted riflemen had. At first, you must carve off the tips of the sattlecloth so that their right side goes straight upside down. Here is a photo comparing the saddlecloth from the original horses (right side) with the conversion (left side):

Edit: here are some pictures of how I made the officers' horse which might display the whole thing a lot better.


...and attach them to the horse...


Now we've got the horse, we can start with the riders.
At first, you may have - for example - a look at http://empire.histofig.com/-Cavalerie,107-.html. As you can see, the relevant differences between mounted riflemen and light horse cavalry are the boots and the helmet decorations. The boots are simply done by cutting off the plumes and the outher rim of the original boots and solve the rest with paint. For the helmets, a bit of creativity is needed.
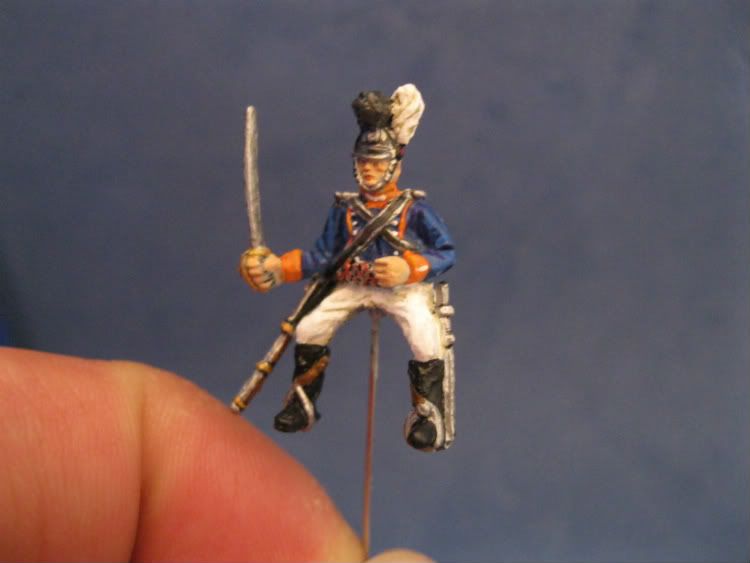
Starting with the officer, you must carefully carve off the caterpillar at the line where it is connected to the crest. Then carve off the crest and glue the caterpillar onto the helmet again. In the same way, you create officer helmets for the mounted riflemen as well. Add a plume. Done.
The plumes are also made with toilet paper and wood glue - dip a piece of toilet paper into the glue, then roll it between your fingers until it has the right size and shape, let it dry out and glue it onto the helmet.
The officers wore a sash. Fill the spaces along the waist belt with flat parts of the toilet paper/wood glue basic plate from which you took the extra saddle parts. Glue them onto the figure and continue with painting (Wurttemberg sashes were silver with black and red wires in it).
Here's the result:

Btw - the procedure concerning the caterpillar is also suitable for converting the riders into mounted horse artillerymen. But let's stay to the light horse for now. The ranks have different helmets with horse tail decoration instead of the caterpillars, while the crests remain. So carve off the caterpillar. Take a thin layer of toilet paper, rip it carefully off from the complete sheet, so that the outer rim has an uneven look and put glue onto the whole thing. Bend it a bit so that the whole result looks at least a bit lively and finally glue it onto the crest. Don't forget to add a plume.
Now it's time to put the rider onto his horse. As the complete saddlegear in now a bit wider than the original figure was, you need to spread the legs of the riders a little bit. You can either do that befor printing (maybe by putting the figure into boiling water for a minute and then reshape it) or just spread the figures' legs a bit by force, then put the figure onto the saddle and let the legs snap back.
The result would then look like this:


E voila - chevau léger! A really colourful addition to every Wurttemberg army, made with only a little additional work. The saddlecloth for the officer is the same, apart from the colours, because the officer would have a big silver stripe with red outer lining instead of the thick red stripe that the ranks had.
Edit: I just finished the officers' horse, so here's the completed result:


And both of them together:

Well - there's still a trumpeter missing, isn't it? I just dropped the Wurttemberg horse artillery idea. I probably rather add the missing trupeter here, as soon as I find an arm with a trumpet for doing the conversion.
I hope you enjoyed todays' show!
A great conversion!
ReplyDeleteBest regards
Rafa
Great ideas! Thanks for the tutorial.
ReplyDeleteI may well try the chevaux-leger conversion when I get my hands on a set.